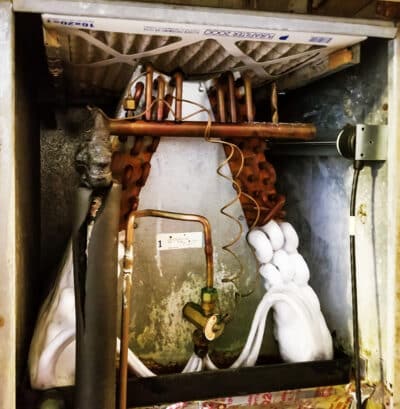
What to do With a Frozen AC Coil
When you have a frozen coil, take these important steps…
As the heat of summer accelerates, so do common air conditioning repairs. Indiana summers can mean your system working against 90 degree weather. This type of weather has a knack for showing the problems within a system quickly leading to costly ac repairs. One of the more distressing problems that comes up is a frozen Evaporator Coil.
Reminder: what is the Evaporator Coil? 
The Evaporator Coil is part of your indoor unit, found adjacent to the furnace. It includes coils (much like your outdoor unit) that help regulate the temperature of your home. Refrigerant passes through these coils to create cool air while the outdoor unit transfers heat. The fan in the furnace then pushes this cool air throughout your home. This makes the Evaporator Coil an important part of your system. However, many people overlook it as it is not as visible as the outdoor unit. Learn more about the Evaporator Coil and other heating and cooling basics in our HVAC 101.
Why do evaporator coils freeze?
As air conditioners age, one of the most common symptoms we see across Indianapolis is a frozen coil. There are a few reason it might happen. Anything that reduces the system’s airflow (for example, a clogged filter), can cause it. Many times it happens because of low refrigerant levels caused by a leak in the system. Whatever is the catalyst, the real issue is that the refrigerant circulating through the coil can’t extract enough heat. This pushes the refrigerant below freezing. As water continues to condense on these below-freezing coils, it then freezes into ice on the surface.
As the coil essentially becomes a large block of ice, technicians are very limited in what they can do to diagnose and repair. So long as the coil remains frozen, not much can be done to fix it. That’s why we recommend home owners allow the coil to thaw first before having a technician come out.
Because the frozen coil can accumulate a good amount of ice, it produces a lot of water when it thaws. The risks of that water thawing and adversely impacting the electrical components of your system are significant. Follow the steps we outline below to ensure that any water damage on your system is minimized.
We recommend following the steps above when thawing the coil.
4 Steps to Thaw a Frozen Coil
1) Turn thermostat Cool setting to OFF.
2) Leave or set the thermostat Fan setting to ON.
3) Place old towel near system to ensure water does not go to unwanted areas. Check periodically to mop up any standing water or replace the towel with a dry one.
4) Monitor progress, then call Homesense when the frozen coil has thawed. This process could take up to 24 hours.
Seeing a frozen coil can be frightening at first, but there are solutions that can get it back to running smoothly. Through the steps above, followed by a visit from a trusted Homesense technician, your system will be back to keeping you cool quickly! And for additional help on all things AC repair, check out our AC Repair and Replacement Guide.